iPhone and iPad
The playmoTV DNS gateway will work on any model of the iPhone and iPad. Some features might be limited to newer models but the basic setting should be the same.
If you are using multiple Wi-Fi networks you may have to repeat this setup when you change to a new Wi-Fi network.
Watch our manual setup guide
Note: In iOS 11 and newer, you should enter the DNS servers separately, as mentioned in our step-by-step guide below.
or go through our step by step guide
 On your home screen, open Settings. This should open up a new window where you can customise the settings on your iPhone/iPad.
 Click the Wi-Fi row, which should be between Airplane Mode and Bluetooth. This should open up the Wi-Fi window. Once you’re there, click the blue (i) icon next to the Wi-Fi network you’re connected to.
 Now scroll down until you see the DNS section, and click the Automatic field. This should open up the next window.
 In this window change the setting from Automatic to Manual.
Important! If there are any DNS entries there already (like 192.168.1.1 or something similar), then delete them by pressing the red minus sign.
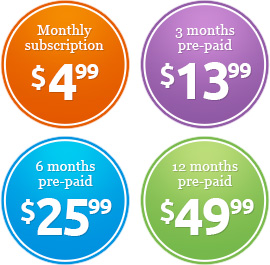
Then press the plus sign to enter your primary DNS server, and then again to enter your secondary DNS server. In the list below you will see all our DNS servers.

You need to be logged in to view this part
Already a member?
- Once you have applied the changes, make sure that iCloud Private Relay is turned off. To turn off iCloud Private Relay, go to Settings on your iOS device. Then click [Your Name] (Apple ID, iCloud, Media & Purchases) at the top. Now click iCloud, then click Private Relay (Beta) and change the toggle to OFF.
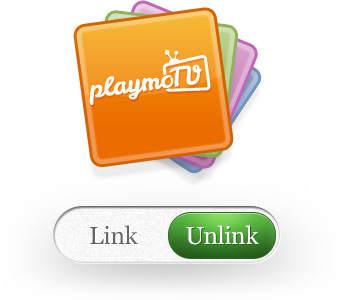
- Now, open the Safari and navigate to https://playmo.tv/my-account to introduce your new device to the playmoTV gateway. What you wanna see are three green checkmarks. If you see “Yes This device is correctly linked” that means that you successfully linked your iOS device to the playmoTV gateway.