playmoTV DNS will work on any model of the iPhone and iPad. By following the setup below and installing the DNS profile for your account, your DNS traffic is encrypted, so DNS entries cannot be seen by others watching network traffic.
How to configure the playmoTV DNS profile for iPhone and iPad
Step 1 – Setup the profile
On your iPhone or iPad, running iOS 14 or newer, visit this page and click the server which is closest to your location.
Important! All servers give you access to US, UK services etc. You do not need to select the United States server to get access to US services. Having multiple locations is meant to improve the response time for general browsing on your iPhone or iPad.
When you click one of the links you will get a prompt asking if you wish to download a configuration profile. Then click Allow
PlaymoTV DNS Profile for iOS (iPhone and iPad)
Click the link below to select the DNS profile file for your device.
Step 2 – Once you have clicked Allow after selecting one of the links above, you should see something like a prompt saying
“1 Downloaded – Review the profile in Settings app if you want to install it”
Step 3 – Now go to the Settings app on your device. Scroll to the top and you should see “Profile Downloaded” as pictured below
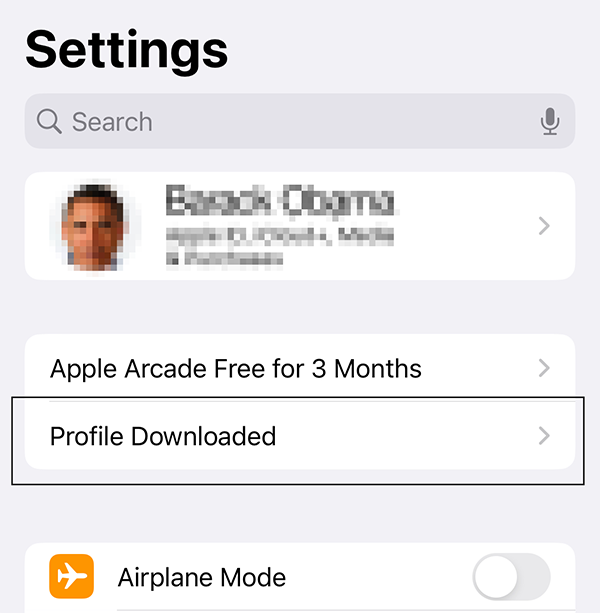
Step 4 – Click Profile Downloaded
Step 5 – Click Install in the upper right corner and enter your passcode.

Step 6 – Click Install again in the upper right corner, and then click Done.
Step 7 – Now go to Settings > VPN & Device Management and click the DNS section (which should say PlaymoTV something). Once you’re in that screen you can select what server you would like to use. Just pick the one closest to your actual location. (Remember, the location of the DNS server does not matter. All our servers give you the same results Picking a server that is closer to your location should give you a better response time).
Step 8 – Close your preferred browser app, by swiping up from the bottom of the screen, pause in the middle of the screen and swipe up on the app’s preview to close the app. Then open it and try again.
Step 9 – Visit playmo.tv/my-account. If everything is configured correctly you should see this:

Attention. If you still see No on playmo.tv/my-account after installing the profile, make sure to disable iCloud Private Relay and turn off any existing VPN applications that you may be using.
To ensure that the profile is active, go to Settings > General > VPN, DNS and Device Management and make sure that playmoTV DNS is selected.