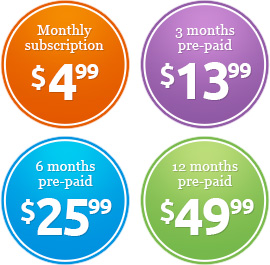
Quick guide to configure Smart DNS on Mac (macOS Sequoia, Sonoma, Ventura and earlier). This improves streaming access while keeping your local internet speeds fast. Works great with PlaymoTV. If you prefer a one-click solution for networks that block custom DNS, check out our VPN plan (supports US Netflix, commercial-free YouTube, and more).
Before You Start
- Have an active PlaymoTV account.
- Log in to your account dashboard and activate Smart DNS and register your current IP address.
- Know whether you’re on Wi-Fi or Ethernet and which Wi-Fi network (SSID) is your Home network.
Step 1 — Open System Settings (previously “System Preferences”)
- Click the Apple menu (top-left).
- Select System Settings. (On older macOS, this was called System Preferences.)
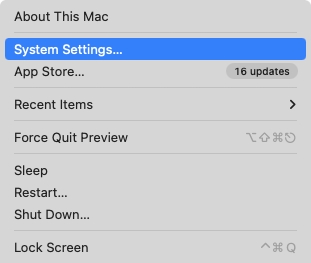
- Alternative ways: Click the System Settings icon in the Dock, or press ⌘ + Space and type “System Settings”.
Step 2 — Open Network for Your Home Connection
- In System Settings, choose Network from the sidebar.
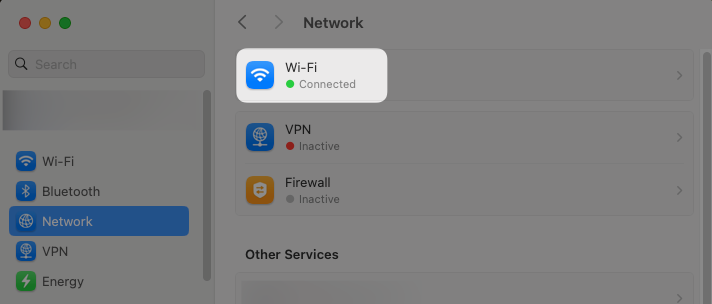
- If you use Wi-Fi at home:
- Click Wi-Fi.
- Ensure you’re connected to your Home network (your SSID’s name).
- Click Details… (on older versions this is Advanced…).
- If you use Ethernet (cable):
- Select Ethernet.
- Click Details… (or Advanced…).
Step 3 — Add Smart DNS Servers
- Inside the connection settings, open the DNS tab.

- Under DNS Servers, click the + button.
- Pick one of these servers and paste it in:
- Iceland37.235.49.3437.235.49.34
- Sweden109.74.12.20109.074.012.020
- England193.105.61.136213.005.182.117
- Canada69.42.58.18069.042.058.018
- Australia150.107.72.42150.107.72.42
- USA162.243.0.97162.243.0.97
- Hong Kong139.59.241.8139.59.241.8
- Germany (adblock)46.101.152.17046.101.152.170
- India (adblock)139.59.19.95139.59.19.95
Pick at least two DNS servers beginning with the closest to you as your first one.
Pick the DNS server located closest to you.
- (Optional) Add the second server as a backup. Drag to reorder so the Smart DNS is first.
- Click OK (or Save), then Apply.
Step 4 — Reconnect Your Home Network
- Turn Wi-Fi off and back on (or unplug/plug Ethernet) to refresh the connection.
- Reopen your browser after the change.
Step 5 — Flush the DNS Cache (Recommended)
- Open Terminal (⌘ + Space → “Terminal”).
- Run the following commands (no output means success):
sudo dscacheutil -flushcache
sudo killall -HUP mDNSResponder
Step 6 — Verify Smart DNS Is Working
- Visit playmo.tv/my-account. On that site you wanna see three green checkmarks (This device is linked, Account status, and Current IP address authenticated).
- Now try visiting the streaming service you wish to acces. Regional catalogs (e.g., US libraries, UK services etc) should now be accessible to you.
- If content looks unchanged, fully quit and reopen your browser and try again.
Optional — Do It via Terminal (Power Users)
Replace "Wi-Fi" with "Ethernet" if needed, and use one IP from the list above.
# List services (note the exact name for Wi-Fi or Ethernet)
networksetup -listallnetworkservices

# Set DNS on Wi-Fi to your Smart DNS server
networksetup -setdnsservers "Wi-Fi" DNS_IP_HERE

# Confirm DNS
networksetup -getdnsservers "Wi-Fi"

# Revert to automatic DHCP DNS later
networksetup -setdnsservers "Wi-Fi" empty
Troubleshooting & “Not correctly linked” Message
- Dashboard shows “Not correctly linked” after applying DNS? It’s possible your router or your internet provider is preventing the use of custom DNS (common on managed or school/work networks).
- Good news: You can still bypass this with our VPN plan, which also supports US Netflix, commercial-free YouTube, and more.
- Try these first:
- Confirm your IP is registered in the PlaymoTV dashboard.
- Move your Smart DNS server to the top of the list.
- Fully quit the streaming app and your browser, then retry.
- If your router enforces DNS, set Smart DNS on the router (and keep your IP registered).
- If your network uses IPv6 heavily, remove custom IPv6 DNS or temporarily disable IPv6 on that interface.
Smart DNS vs. VPN — Which Should You Use?
- Smart DNS: Fast, lightweight, ideal when your network allows custom DNS.
- VPN: Works even if your ISP/router blocks DNS changes, and adds privacy & encryption. Our VPN plan supports US Netflix, commercial-free YouTube, and more.
FAQs (SEO Quick Answers)
- Where are DNS settings on Mac? → System Settings → Network → Wi-Fi/Ethernet → Details/Advanced → DNS.
- Is Smart DNS legal? Yes—changing DNS servers on your Mac is a standard network setting.
- Will Smart DNS slow down my internet? Typically no; it routes only specific traffic needed for streaming unlocks.
Done! You’ve set up Smart DNS on your Mac. If your network blocks custom DNS or you want simpler setup across every network, use our VPN plan with support for US Netflix, commercial-free YouTube, and more.